
How to Install Gaia on an IP Appliance

How to Install Gaia on an IP Appliance


Youtube Click HERE


How to Install Gaia on an IP Appliance


Objective:

Clean installation of Gaia on an IP Appliance with IPSO
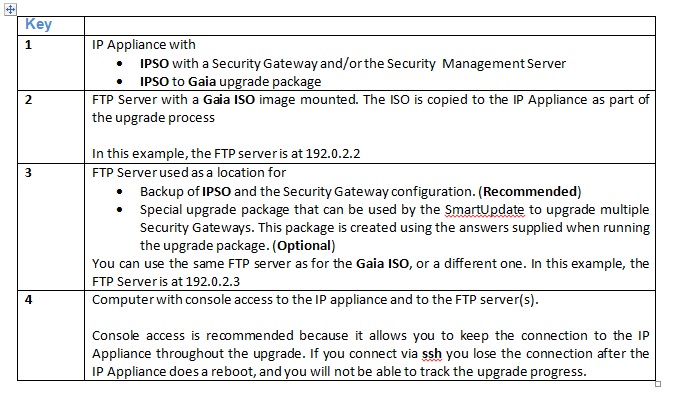
Set up the environment:
Procedure:
Step 1: Get the IPSO to Gaia boot-manager package and the Gaia ISO image.
https://supportcenter.checkpoint.com/supportcenter/portal?eventSubmit_doShowupgradewizard
Step 2: Point the Gaia ISO on an FTP server:
Method:
  • Using Isomorphic tool transfer the image file and make pen drive bootable. 
  • Then transfer the contents of same pen drive to the pc where ftp server is configured. Extract it and place it in a folder (here the folder name is GAIA).]
  • After extraction, you have to run the *.bat file. 
Open up a command prompt, a black screen comes up. Drag and drop your .bat file onto the window. If that doesn’t work us cd (change directory) to go to where the file is and then press enter. I'll give you an example, let’s say execute.bat is on my desktop: 

start>run>cmd (enter) then with the window open cd C:\GAIA/(enter) then execute.bat (enter).
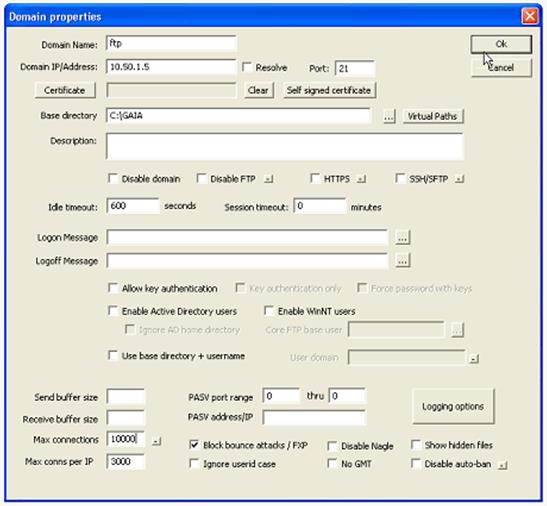
  • Check for the FTP server configuration parameters and point the ISO folder path (here my path is C:/GAIA) to be installed.
Initially:
  • Parameters to be set are
Step3:  Now download the R7X.XX Gaia boot manager (*.sh) and place it in the appliance location /script.  Give chmod 777 and Install as shown below.
  • Verify that the boot manager is located in the logical drive ad0 by running the command
ipsctl –a | grep CF
 The output will be similar to
hw:disk:ad:0:location = InternalCF
hw:disk:ad:0:type = CF-INTERNAL-IDE
Once the Gaia boot manager is installed successfully, appliance will reboots and (press 1) shows as below.
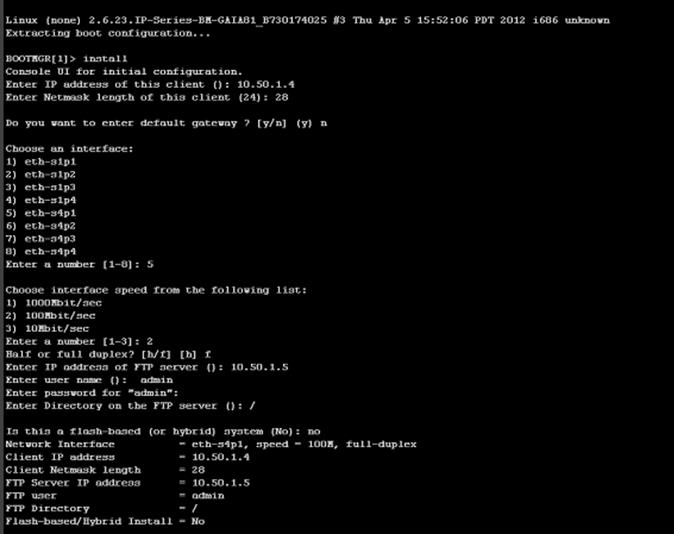
Step4:  Follow the instructions and enter the data. Make sure Ftp server interface is up and running (here interface from appliance to ftp is eth-s4p1).
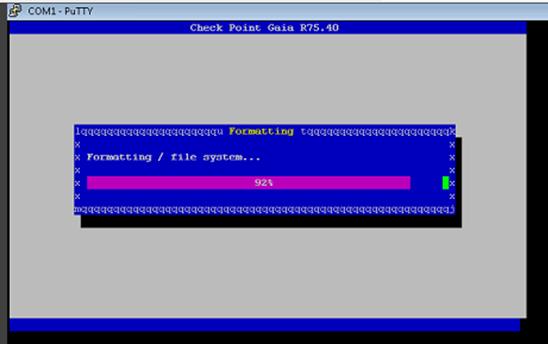
Device reboots and starts installing Gaia if all the values are correct
  • System restarts once the installation is completed. 
Step5: Now we can run first time wizard by using the IP address of the appliance

Comments

Popular posts from this blog

How to modify SSH/HTTP/Telnet time out in Cisco ASA firewall?

How to modify SSH/HTTP/Telnet time out in Cisco ASA firewall? By default tcp idle timeout is 1:0:0 hh:mm:ss. If in case you need to modify it you can do it by MPF (Modular Policy Framework). Let us setup a custom timeout when traffic is coming from particular host 10.77.241.129. !— Match the traffic using the access-list —! object-group service DM_INLINE_TCP_1 tcp port-object eq www port-object eq ssh port-object eq telnet access-list outside_mpc extended permit tcp host 10.77.241.129 <source ip> any object-group DM_INLINE_TCP_1 !— Define the class map Cisco-class –! class-map Cisco-class match access-list outside_mpc !— Call this class-map into policy map and set the connection reset after 10 min when traffic is coming from particular host —! policy-map Cisco-policy class Cisco-class set connection timeout idle 0:10:00 reset !— Apply the policy-map Cisco-policy on the interface. —! service-policy Cisco-p...

Checkpoint firewall common commands part 2

Checkpoint firewall common commands part 2 For basic firewall informaton gathering: fgate stat -Status and statistics of Flood-Gate-1. fwaccel <stat|stats|conns>  – View status, statistics or connection table of SecureXL. fw getifs -Show list of configured interfaces with IP and netmask. cpstat <app_flag> [-f flavour] -View OS, HW and CP application status. Issue cpstat without any options to see all possible application flags <app_flag> and corresponding flavours. Examples: cpstat fw -f policy – verbose policy info cpstat os -f cpu – CPU utilization statistics cpinfo -y all   -List all installed patches and hotfixes. cpd_sched_config print -Show task scheduled with CPD scheduler. enabled_blades -View enabled software blades avsu_client [-app <app>]   , get_version <app>  -Get signature version and status of content security .Without the -app option “Anti Virus” is used. show co...

FortiGate: Upgrading the firmware via CLI

FortiGate: Upgrading the firmware via CLI To use the following procedure, you must have a TFTP or FTP server that FortiDB can connect to. You must also log in using the “admin” administrator account. Start the FTP or TFTP server. Copy the new firmware image file to the FTP or TFTP server. Log into the CLI. Verify that FortiDB can connect to the FTP or TFTP server. For example, if the IP address of the TFTP server is 192.168.1.168, enter the CLI command: execute ping 192.168.1.168 Enter the following command to copy the firmware image from the TFTP server to FortiDB: execute restore image ftp execute restore image tftp Where is the name and location of the firmware image file and or is the IP address of the FTP or TFTP server. For example, if the firmware image file name is image.out and the IP address of the FTP or TFTP server is 192.168.1.168, enter: execute restore image tftp image.out 192.168.1.168 FortiDB responds with the message: This oper...