
IPv6 IPsec VPN Tunnel Palo Alto <-> FortiGate
While it was quite easy to bring the tunnel “up”, I had some problems tunneling both Internet Protocols over the single phase 2 session. The reason was some kind of differences within the IPsec tunnel handling between those two firewall vendors. Here are the details along with more than 20 screenshots and some CLI listings.
Lab
My lab consists of a Palo Alto Networks PA-200 firewall with PAN-OS 8.0.3, and a Fortinet FortiWiFi 90D with Firmware Version v5.4.5, build1138. I am using some uncommon but highly secure crypto protocols: Diffie-Hellman group 20 (have a look here), AES-256, SHA-512 and a lifetime of 28800 s (IKE) respectively 3600 s (IPsec). The following figure shows the IP addressing scheme. Note that the VPN tunnel is established over IPv6 only while it tunnels IPv6 and legacy IP!
The configuration was almost straightforward. However, it took me a while to understand the handling of the phase 2 sessions: While Palo Alto simply establishes a single phase 2 tunnel and forwards IPv6 as well as IPv4 packets through it, FortiGate needs two different phase 2 tunnels, one for IPv6 and one for IPv4. That is: I configured two Proxy IDs on the Palo as well, one for IPv6 and another for IPv4. Here are some information from Forti that helped me in thinking about several phase 2 settings.
Configuration Palo Alto
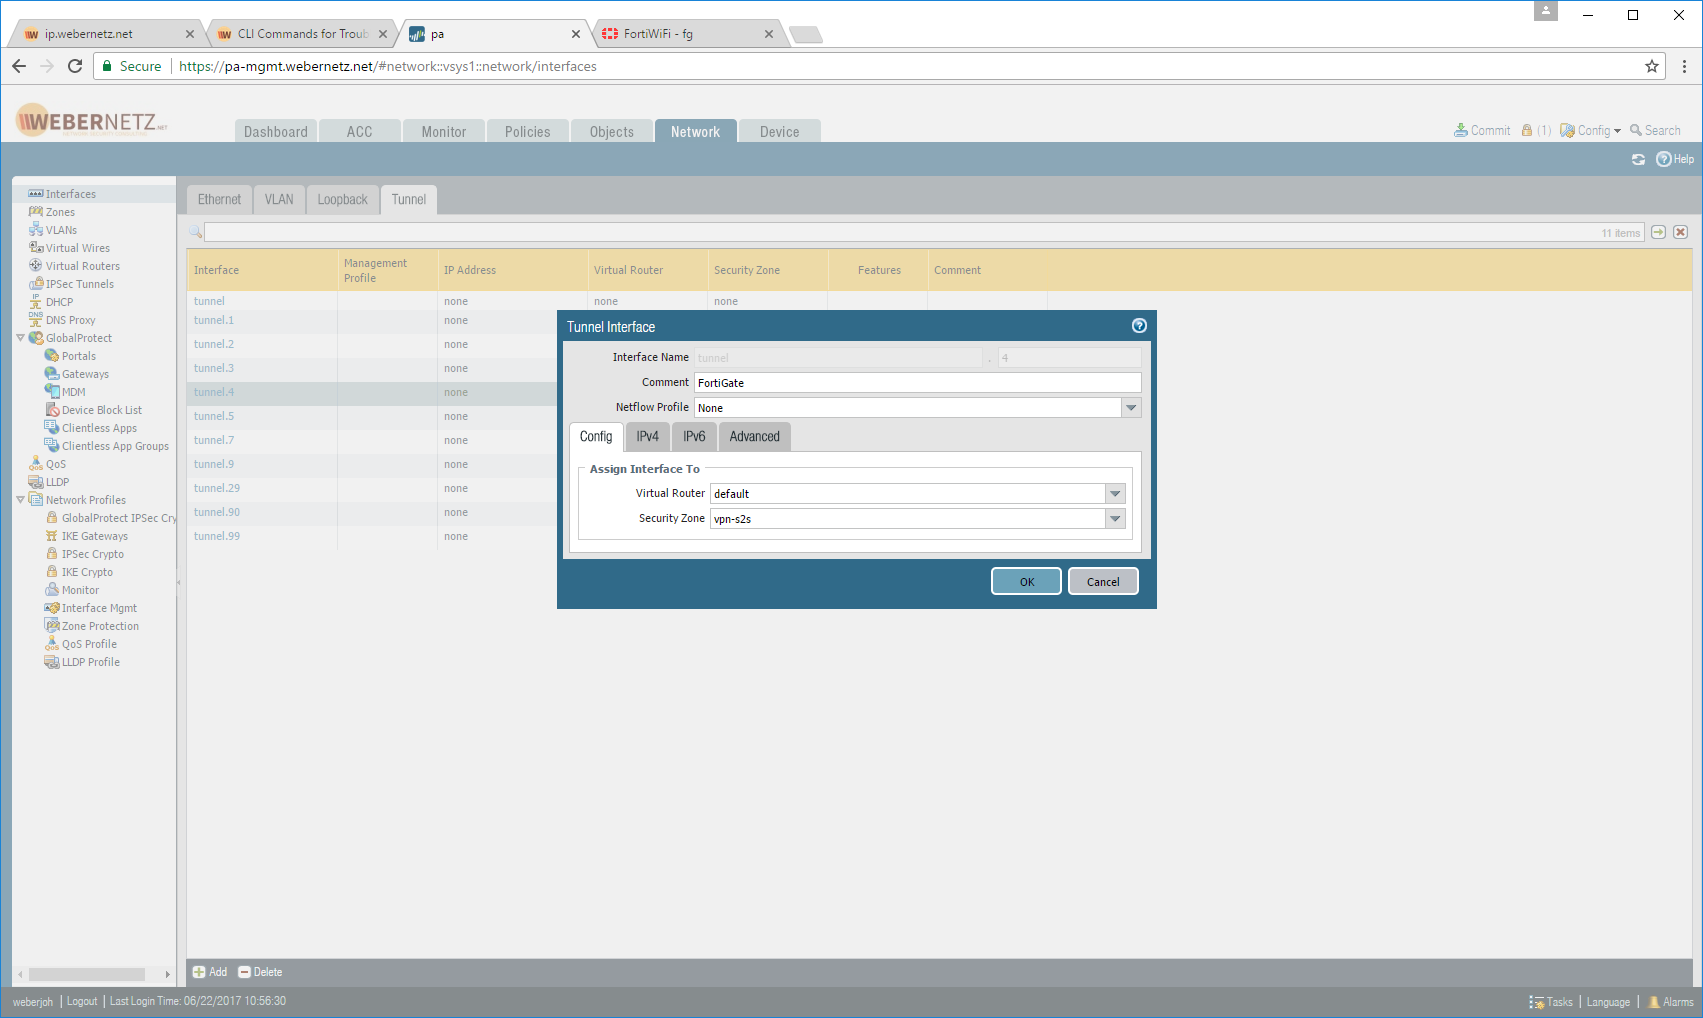
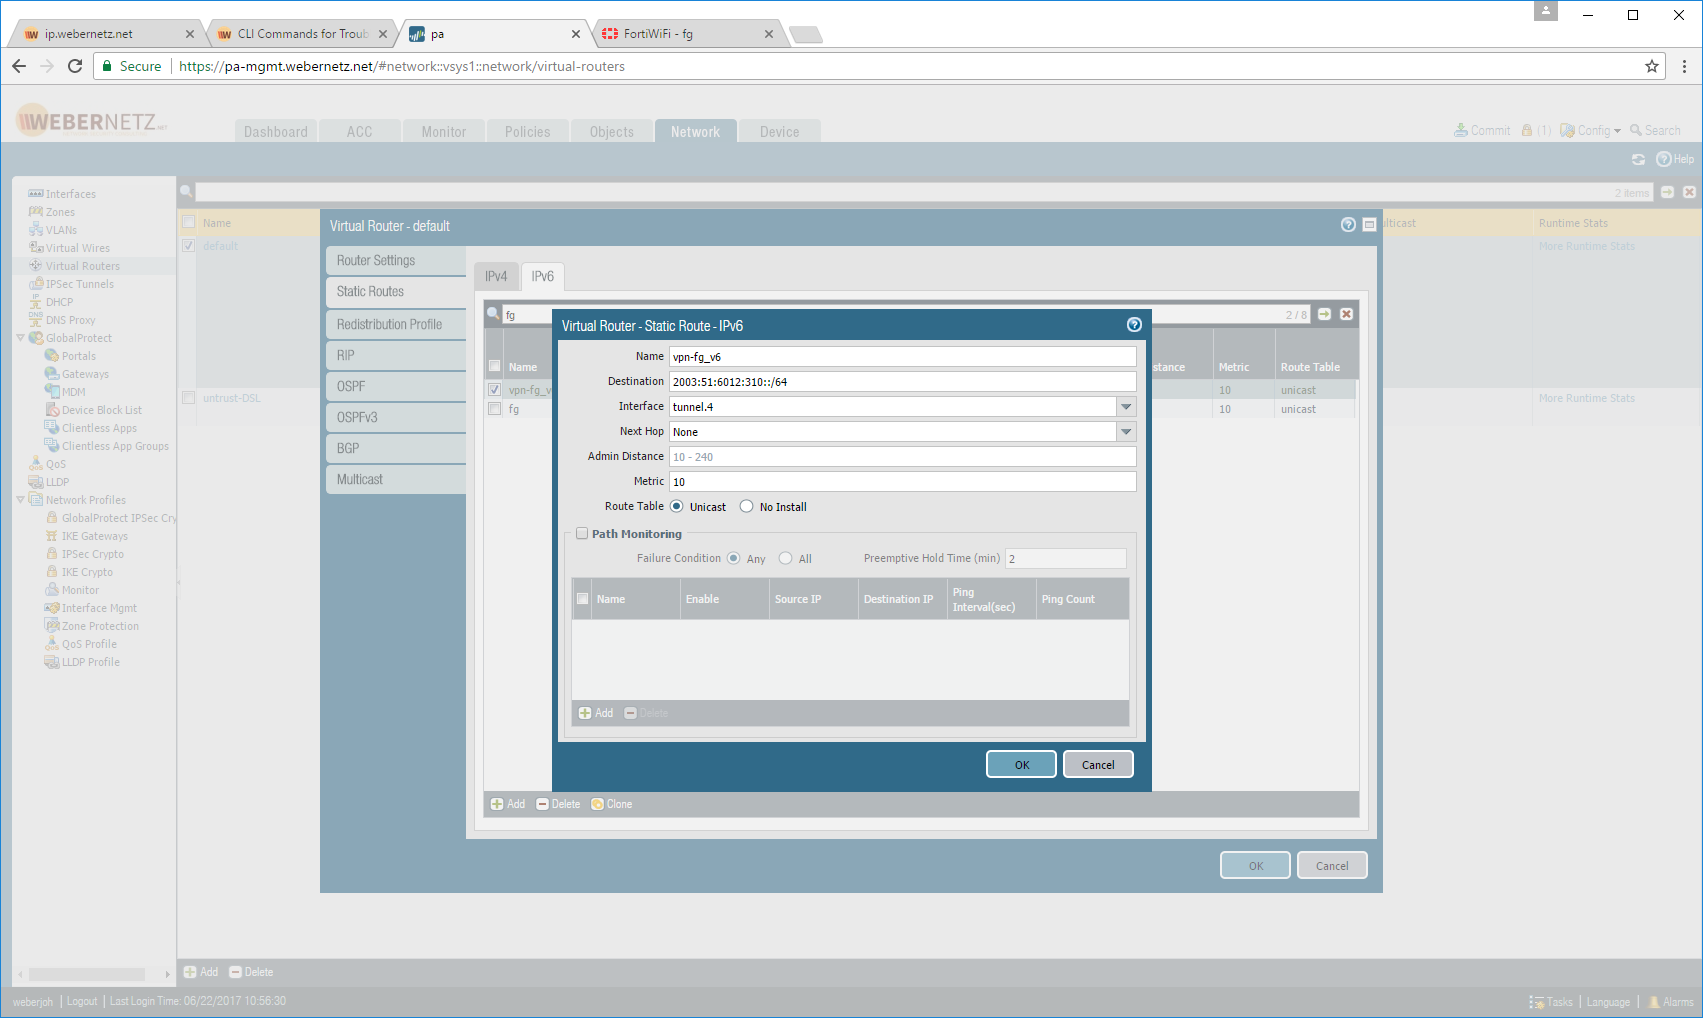
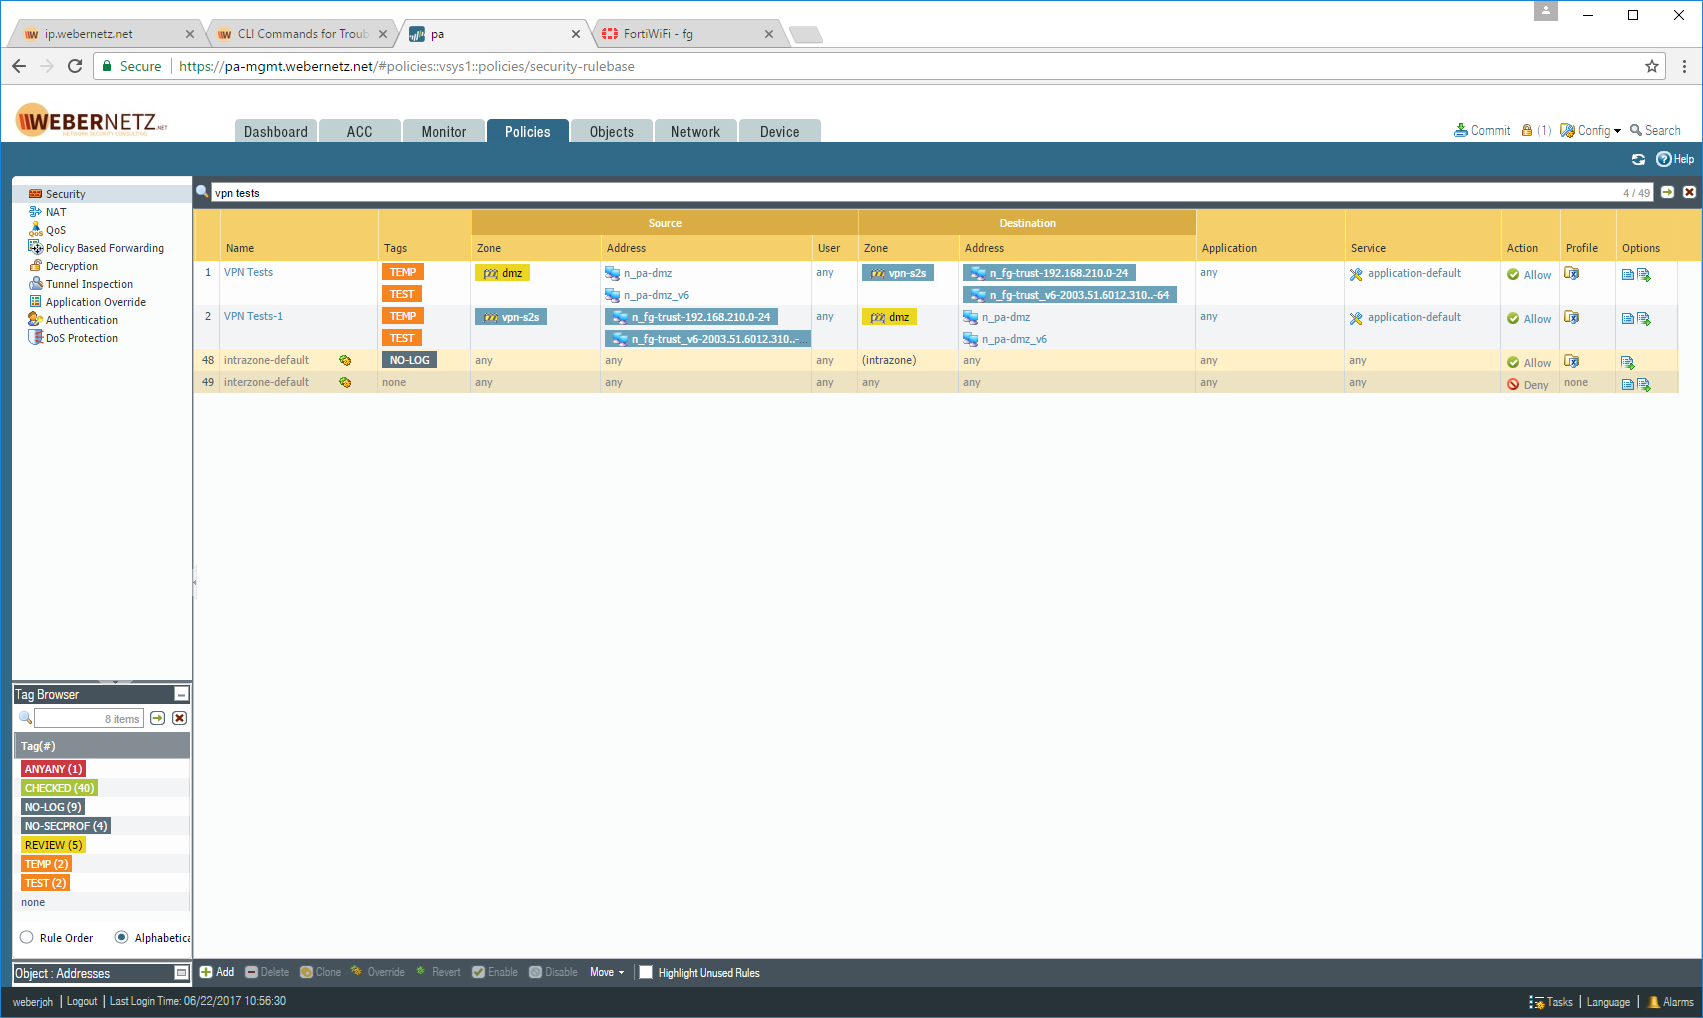
The configuration of the Palo firewall consists of the following steps: IKE Gateway, Tunnel Interface, IPsec Tunnel with Proxy IDs for IPv6 and IPv4, static routes for IPv6 and IPv4, dual-stack policies. Here we go: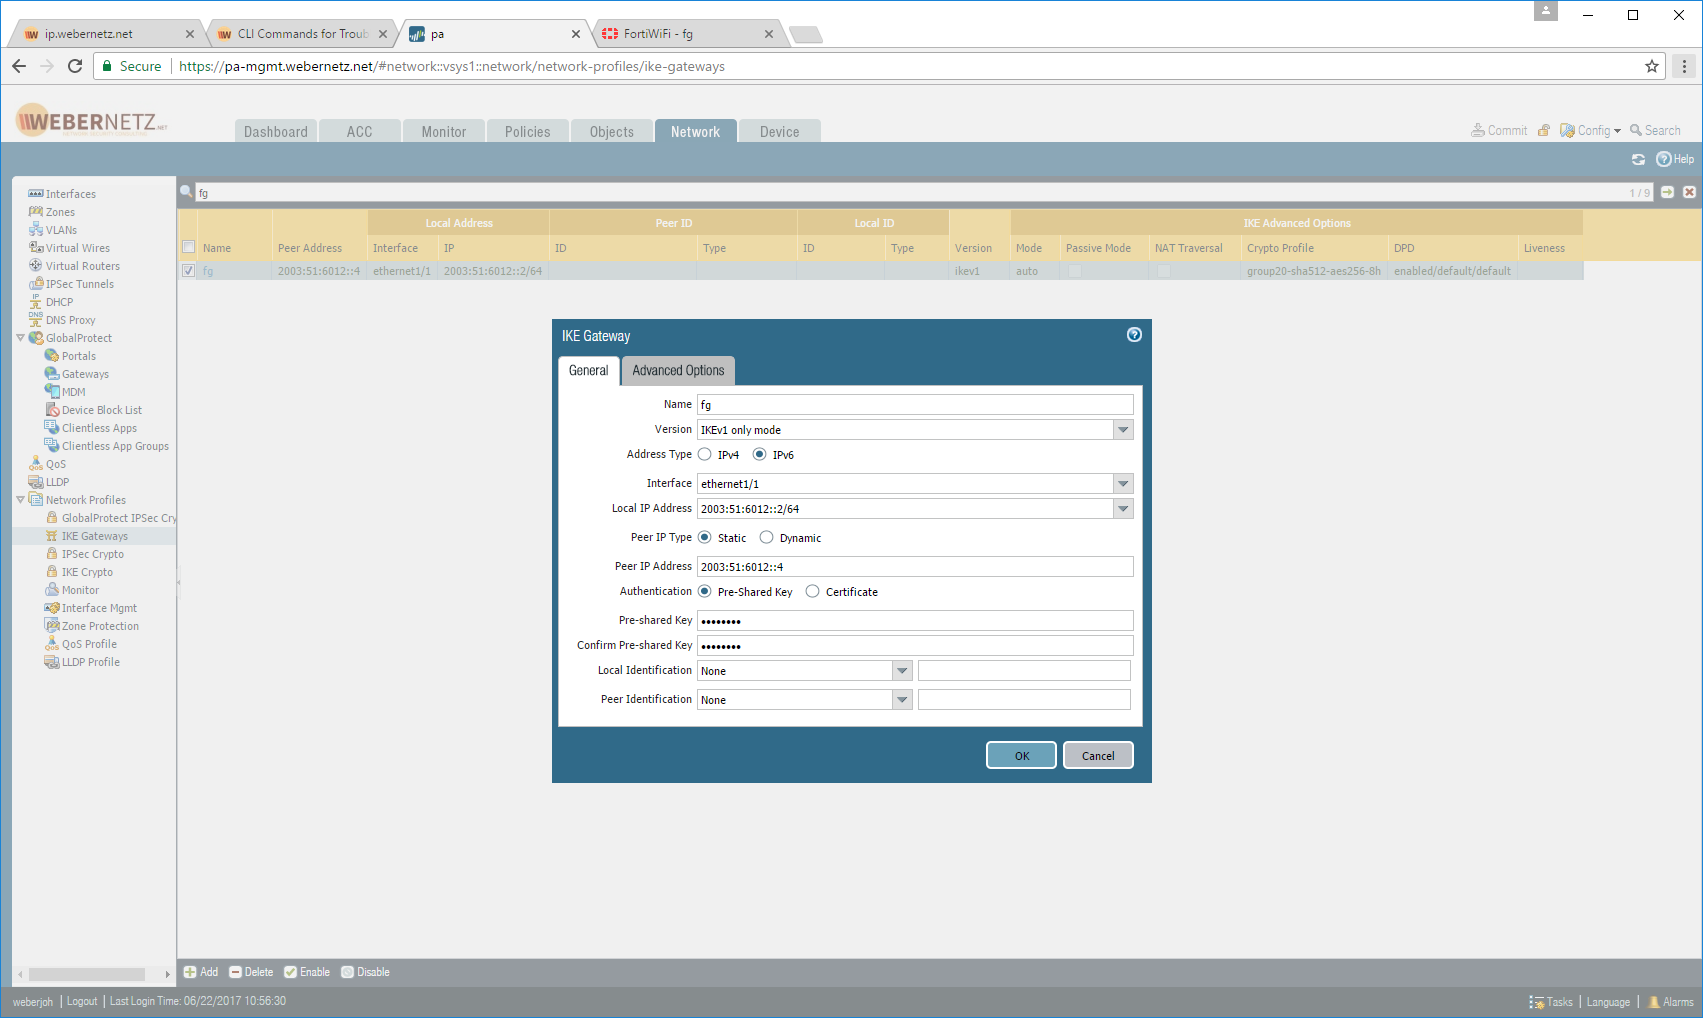


Configuration FortiGate
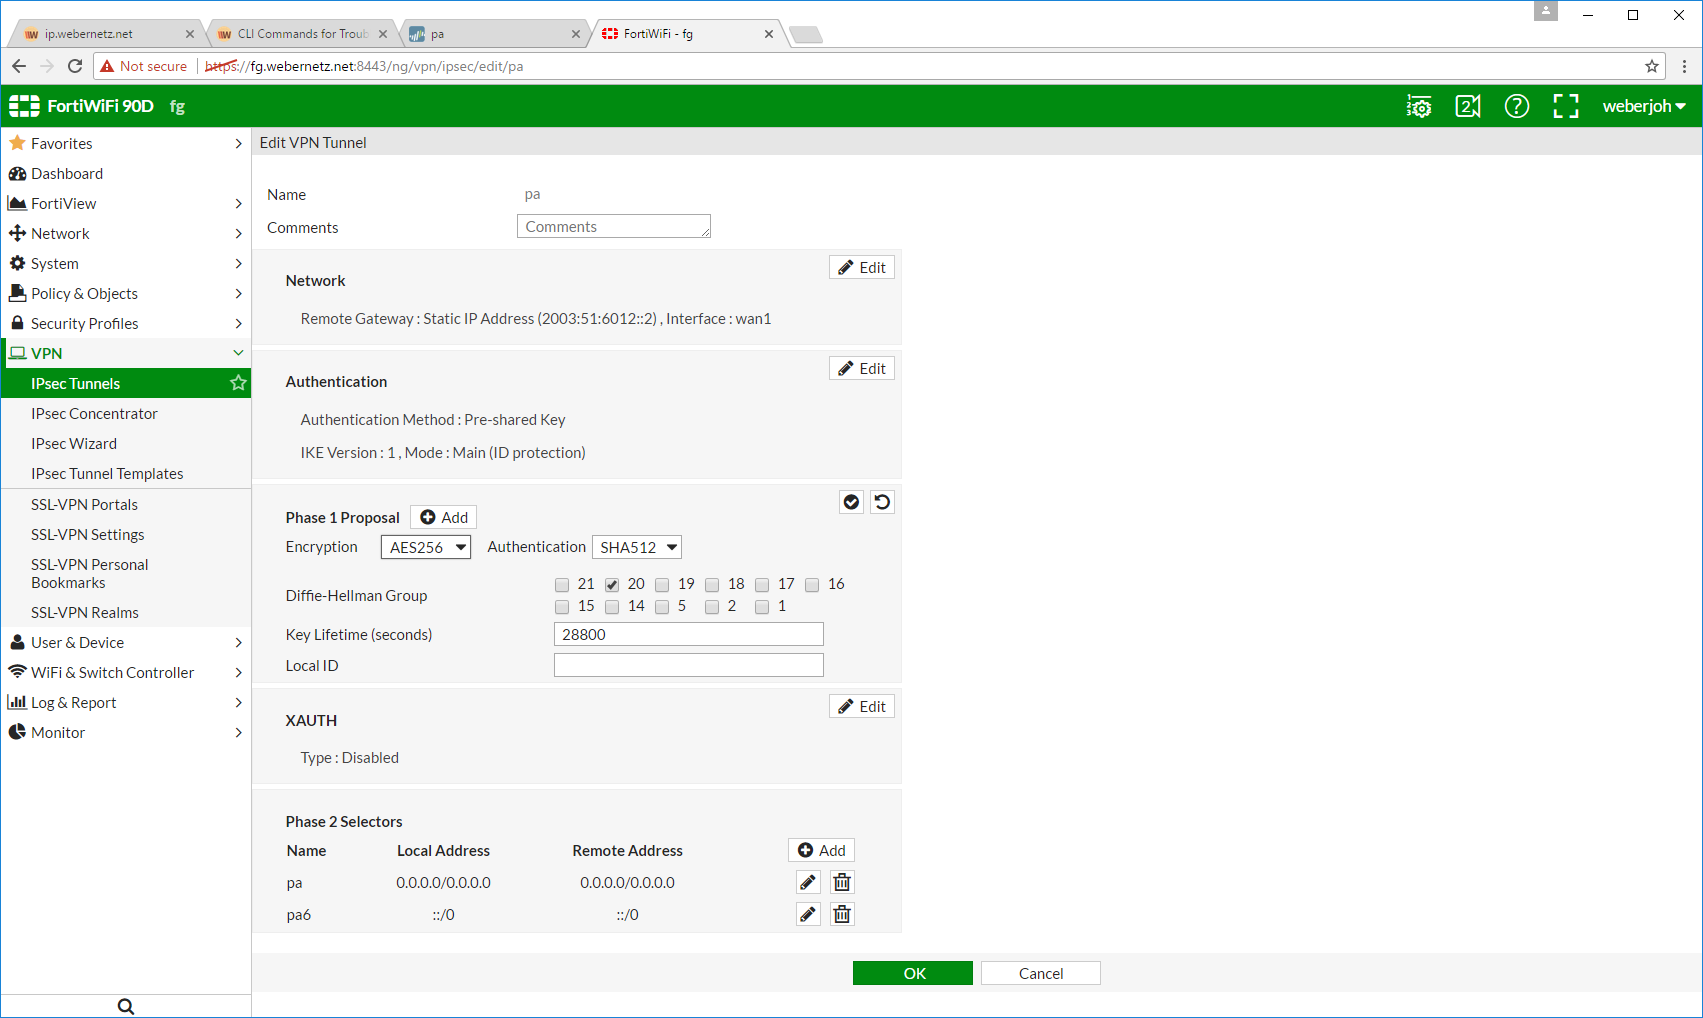
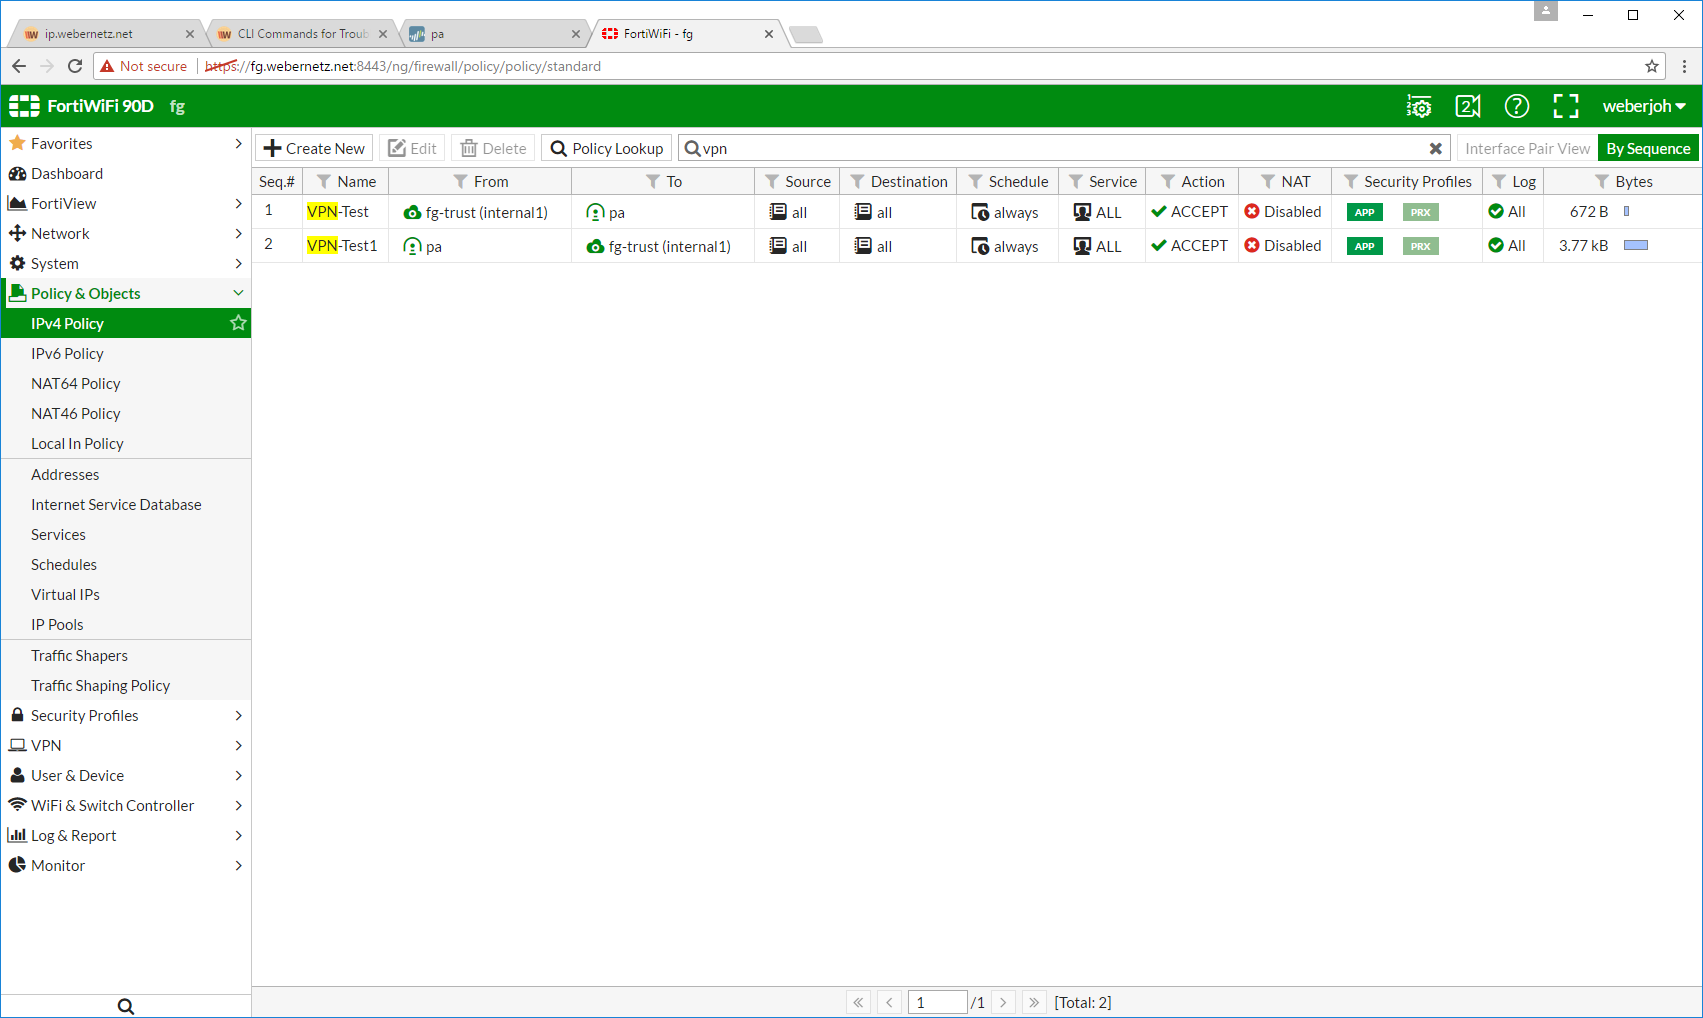
Except the tunnel interface (which must not be added separately) and two separate policy sets (since FortiGate has a shit policy design which distinguishes between the Internet Protocols) the config on the FortiGate is very similar: IPsec Tunnel with Gateway, Authentication, Phase 1 Proposal and two Phase 2 Selectors (IPv6 and IPv4), as well as two static routes (IPv6 and IPv4) and four policies (IPv6 and IPv4). Let’s do this: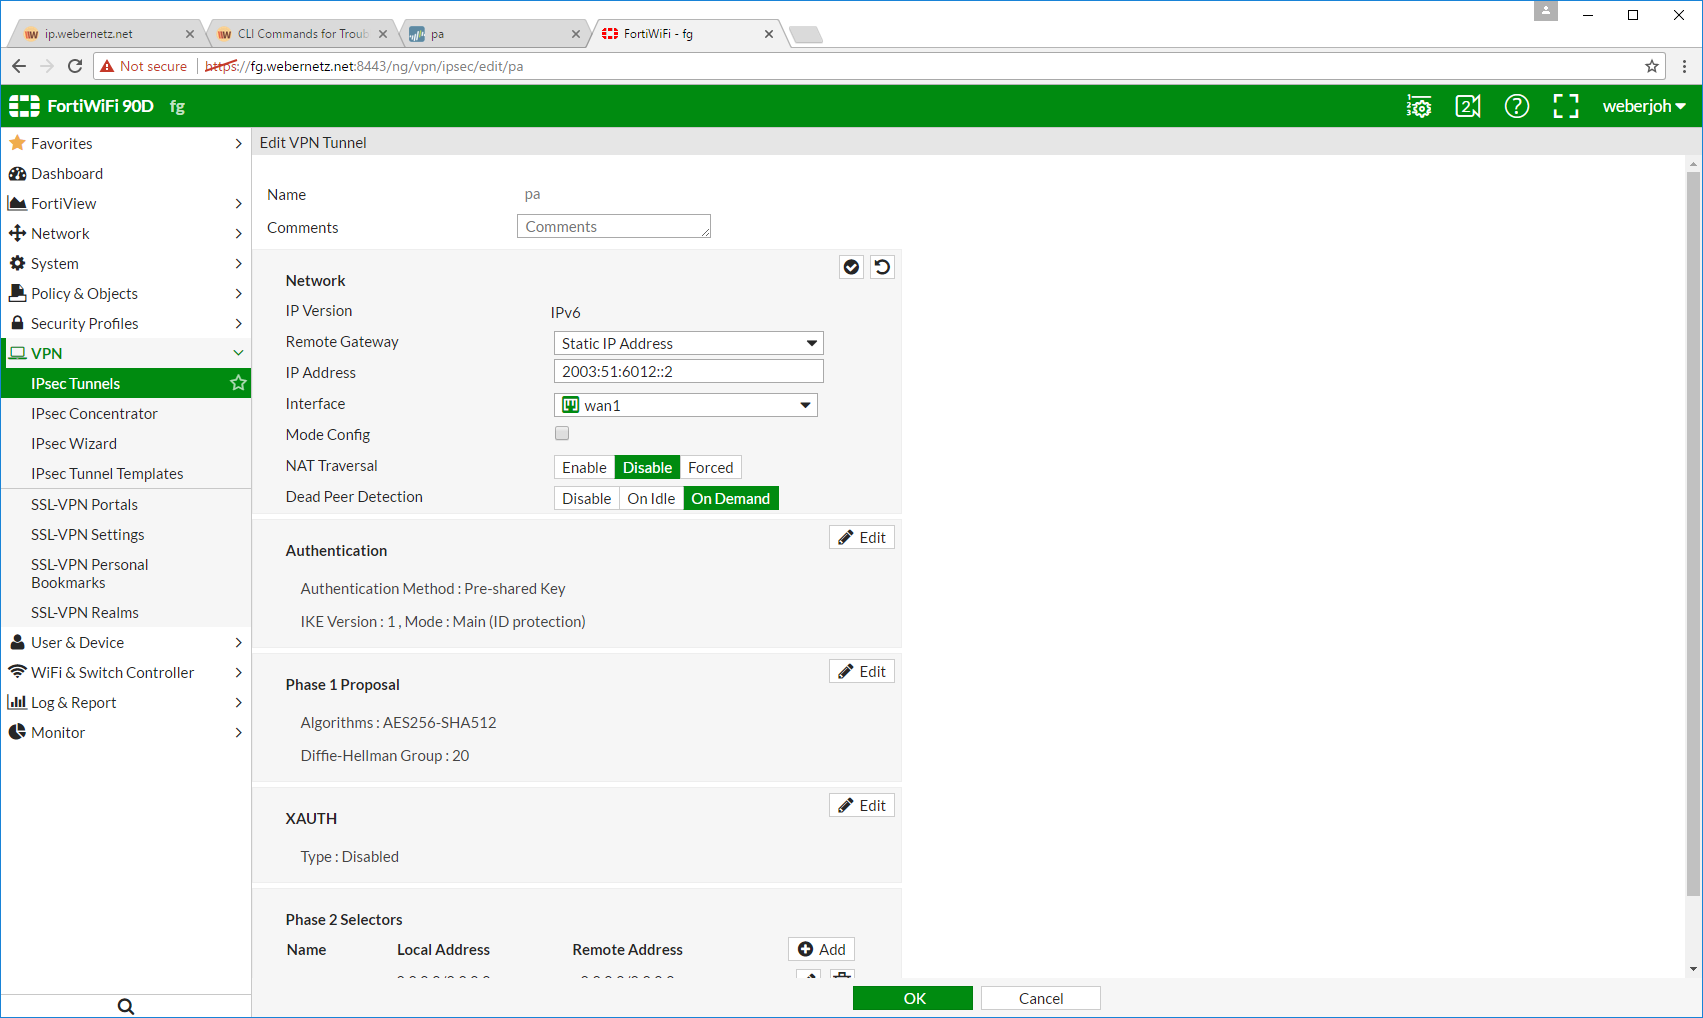


Monitoring
I had two Ubuntu clients, one behind each firewall. Rather than only pinging I did some file transfers via ssh/scp. Here are some traffic logs from both firewalls: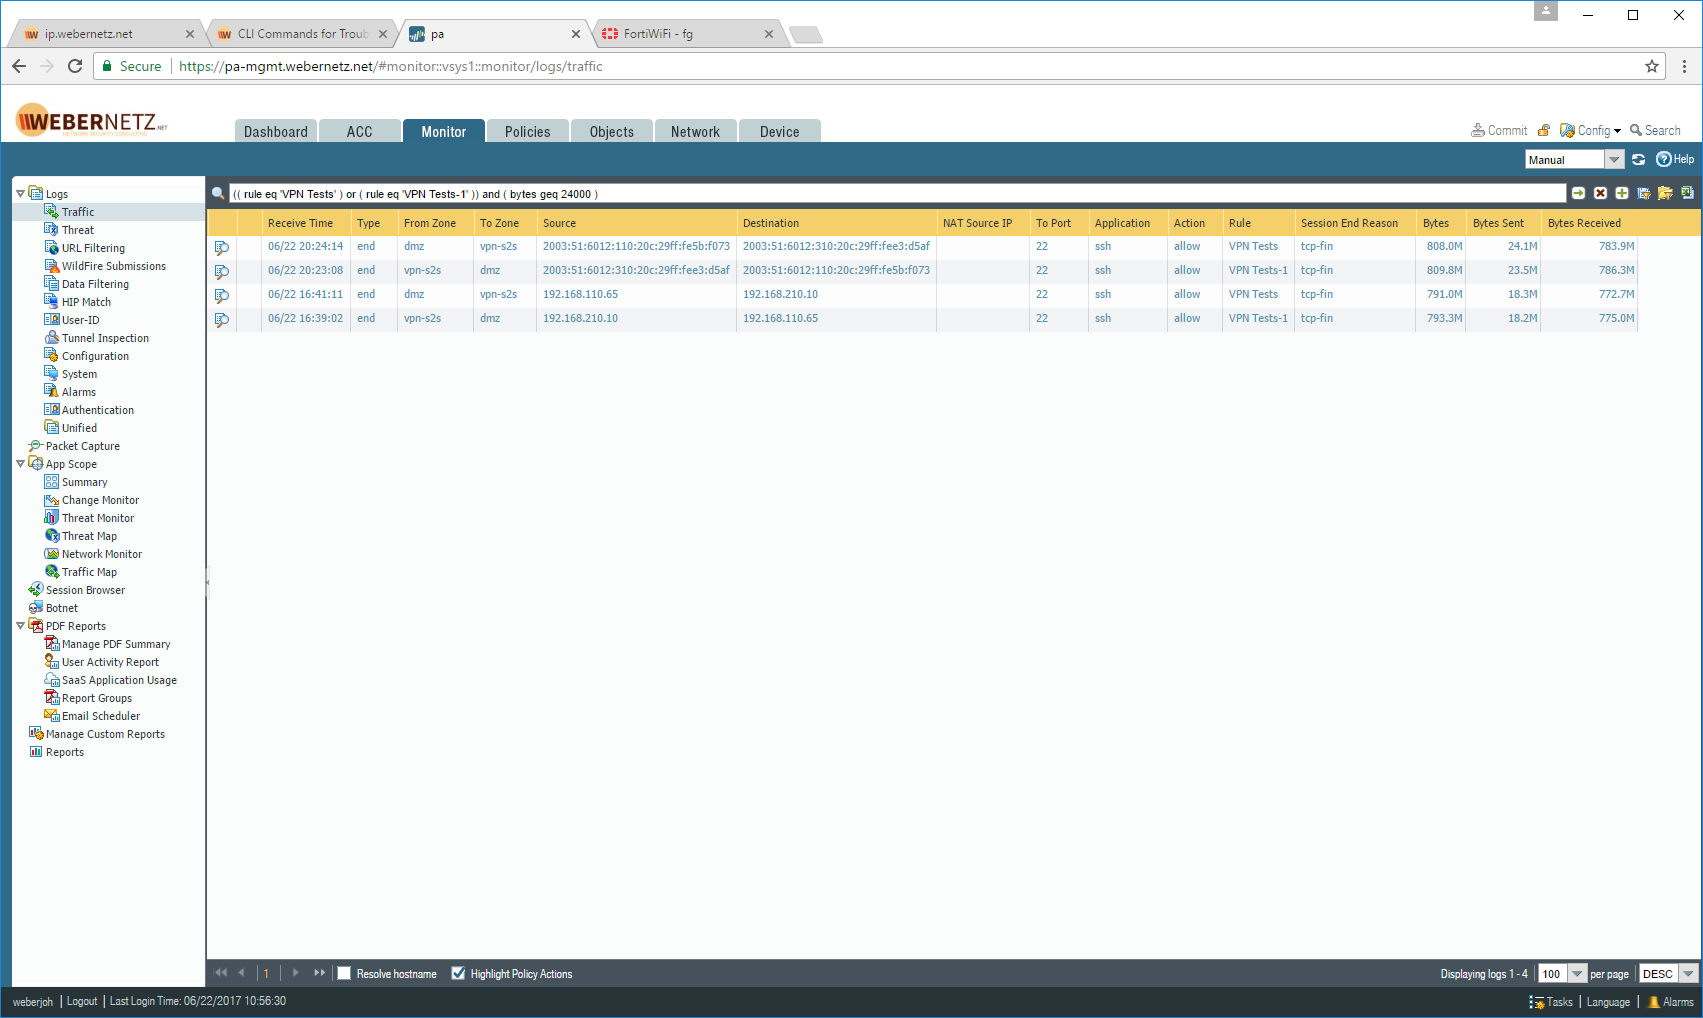


On the FortiGate everything seems to be ok. The counters increased for both phase 2 tunnels, i.e., IPv6 and legacy IP.

Here are some CLI outputs from the Palo Alto:
|
1
2
3
4
5
6
7
8
9
10
11
12
13
14
15
16
17
18
19
20
21
22
23
24
25
26
27
28
29
30
31
32
33
34
35
36
37
38
39
40
41
42
43
44
45
46
47
48
49
50
51
52
53
54
55
56
57
58
59
60
61
62
63
64
65
66
67
68
69
70
71
72
73
74
75
76
77
78
79
80
81
82
83
84
85
86
87
88
89
90
91
92
93
94
95
96
97
98
99
100
101
102
103
104
105
106
107
108
109
110
111
112
113
114
115
116
117
118
119
120
121
122
123
124
125
126
127
128
129
130
131
132
133
134
135
136
137
138
139
140
141
142
143
144
145
146
147
148
149
150
151
152
153
154
155
156
157
158
159
160
161
162
163
164
165
166
|
weberjoh@pa> show vpn ike-sa detail gateway fg
IKE Gateway fg, ID 23 2003:51:6012::2 => 2003:51:6012::4
Current time: Jun.23 08:58:06
IKE Phase1 SA:
Cookie: E2961AA79220F222:8323B3551B209700 Resp
State: Dying
Mode: Main
Authentication: PSK
Proposal: AES256-CBC/SHA512/DH20
NAT: Not detected
Message ID: 0, phase 2: 0
Phase 2 SA created : 6
Created: Jun.23 06:38:57, 2 hours 19 minutes 10 seconds ago
Expires: Jun.23 14:38:57
weberjoh@pa>
weberjoh@pa>
weberjoh@pa> show vpn ipsec-sa tunnel fg:fg
GwID/client IP TnID Peer-Address Tunnel(Gateway) Algorithm SPI(in) SPI(out) life(Sec/KB)
-------------- ---- ------------ --------------- --------- ------- -------- ------------
23 32 2003:51:6012::4 fg:fg(fg) ESP/A256/SHA512 C6A6143D 3D713073 2256/0
Show IPSec SA: Total 1 tunnels found. 1 ipsec sa found.
weberjoh@pa>
weberjoh@pa>
weberjoh@pa> show vpn ipsec-sa tunnel fg:fg6
GwID/client IP TnID Peer-Address Tunnel(Gateway) Algorithm SPI(in) SPI(out) life(Sec/KB)
-------------- ---- ------------ --------------- --------- ------- -------- ------------
23 33 2003:51:6012::4 fg:fg6(fg) ESP/A256/SHA512 E970A075 3D713074 2251/0
Show IPSec SA: Total 1 tunnels found. 1 ipsec sa found.
weberjoh@pa>
weberjoh@pa>
weberjoh@pa> show vpn tunnel name fg:fg
TnID Name Gateway Local Proxy IP Ptl:Port Remote Proxy IP Ptl:Port Proposals
---- ---- ------- -------------- -------- --------------- -------- ---------
32 fg:fg fg 0.0.0.0/0 0:0 0.0.0.0/0 0:0 ESP tunl [DH20][AES256][SHA512] 3600-sec 0-kb
Show IPSec tunnel config: Total 1 tunnels found.
weberjoh@pa>
weberjoh@pa>
weberjoh@pa> show vpn tunnel name fg:fg6
TnID Name Gateway Local Proxy IP Ptl:Port Remote Proxy IP Ptl:Port Proposals
---- ---- ------- -------------- -------- --------------- -------- ---------
33 fg:fg6 fg ::/0 0:0 ::/0 0:0 ESP tunl [DH20][AES256][SHA512] 3600-sec 0-kb
Show IPSec tunnel config: Total 1 tunnels found.
weberjoh@pa>
weberjoh@pa>
weberjoh@pa> show vpn flow name fg:fg
tunnel fg:fg
id: 32
type: IPSec
gateway id: 23
local ip: 2003:51:6012::2
peer ip: 2003:51:6012::4
inner interface: tunnel.4
outer interface: ethernet1/1
state: active
session: 52082
tunnel mtu: 1388
soft lifetime: 3533
hard lifetime: 3600
lifetime remain: 2367 sec
lifesize remain: N/A
latest rekey: 1233 seconds ago
monitor: off
monitor packets seen: 0
monitor packets reply:0
en/decap context: 52
local spi: C6A6143D
remote spi: 3D713073
key type: auto key
protocol: ESP
auth algorithm: SHA512
enc algorithm: AES256
anti replay check: yes
copy tos: no
authentication errors: 0
decryption errors: 0
inner packet warnings: 0
replay packets: 0
packets received
when lifetime expired:0
when lifesize expired:0
sending sequence: 0
receive sequence: 0
encap packets: 1613178
decap packets: 832007
encap bytes: 1622213232
decap bytes: 805950680
key acquire requests: 0
owner state: 0
owner cpuid: s1dp0
ownership: 1
weberjoh@pa>
weberjoh@pa>
weberjoh@pa> show vpn flow name fg:fg6
tunnel fg:fg6
id: 33
type: IPSec
gateway id: 23
local ip: 2003:51:6012::2
peer ip: 2003:51:6012::4
inner interface: tunnel.4
outer interface: ethernet1/1
state: active
session: 51399
tunnel mtu: 1388
soft lifetime: 3586
hard lifetime: 3600
lifetime remain: 2369 sec
lifesize remain: N/A
latest rekey: 1231 seconds ago
monitor: off
monitor packets seen: 0
monitor packets reply:0
en/decap context: 59
local spi: E970A075
remote spi: 3D713074
key type: auto key
protocol: ESP
auth algorithm: SHA512
enc algorithm: AES256
anti replay check: yes
copy tos: no
authentication errors: 0
decryption errors: 0
inner packet warnings: 0
replay packets: 0
packets received
when lifetime expired:0
when lifesize expired:0
sending sequence: 0
receive sequence: 0
encap packets: 71
decap packets: 830129
encap bytes: 9656
decap bytes: 820196200
key acquire requests: 64
owner state: 0
owner cpuid: s1dp0
ownership: 1
weberjoh@pa>
|
|
1
2
3
4
5
6
7
8
9
10
11
12
13
14
15
16
17
18
19
20
21
22
23
24
25
26
27
28
29
30
31
32
33
34
35
36
37
38
39
40
41
42
43
44
45
46
47
48
49
50
51
52
53
54
55
56
57
58
59
60
61
62
63
64
65
66
67
68
69
70
71
72
73
74
75
|
fg # get vpn ike gateway pa
vd: root/0
name: pa
version: 1
interface: wan1 6
addr: 2003:51:6012::4:500 -> 2003:51:6012::2:500
created: 8512s ago
IKE SA created: 1/1 established: 1/1 time: 200/200/200 ms
IPsec SA created: 2/6 established: 2/6 time: 20/105/300 ms
id/spi: 59 e2961aa79220f222/8323b3551b209700
direction: initiator
status: established 8512-8512s ago = 200ms
proposal: aes-256-sha512
key: 82899d51b5b35217-e3a0138c5952ea5a-4cbb58af1ac66bc9-5cd33e8471f2e976
lifetime/rekey: 28800/19987
DPD sent/recv: 00000042/00000b1d
fg #
fg #
fg # get vpn ipsec tunnel name pa
gateway
name: 'pa'
type: route-based
local-gateway: 2003:51:6012::4:0 (static)
remote-gateway: 2003:51:6012::2:0 (static)
mode: ike-v1
interface: 'wan1' (6)
rx packets: 2054 bytes: 410816 errors: 0
tx packets: 2064 bytes: 194056 errors: 0
dpd: on-demand/negotiated idle: 20000ms retry: 3 count: 0
selectors
name: 'pa'
auto-negotiate: enable
mode: tunnel
src: 0:0.0.0.0/0.0.0.0:0
dst: 0:0.0.0.0/0.0.0.0:0
SA
lifetime/rekey: 3600/2086
mtu: 1390
tx-esp-seq: 1
replay: enabled
inbound
spi: 3d713073
enc: aes-cb 37254608594da990ec74eaf9462db97685f0a44d98dff69ee1d565267d9d1e3f
auth: sha512 35445510111d8f6765e63426709da6d5446d03916bbb36a78cf67e5b6e30e1a66467ba55edc0df6815eb501d8380a550fa979d95678a855962b0c4448e5cb23b
outbound
spi: c6a6143d
enc: aes-cb e73b0d5bfdfe926e89904732832a5980e626a3392812e00ee7eafef4812459b3
auth: sha512 965e87be0736d9230c9389159e4c34cf56a4210a64324d92a340284018174def8bacd925b559da5b6d2ec66f630bb95903a8da9491348986ee4eeada0df73438
NPU acceleration: none
selectors
name: 'pa6'
auto-negotiate: enable
mode: tunnel
src: 0:::/0:0
dst: 0:::/0:0
SA
lifetime/rekey: 3600/2090
mtu: 1390
tx-esp-seq: 3
replay: enabled
inbound
spi: 3d713074
enc: aes-cb e10afdf36b9f30ff4c396490dd6ad31cca54234d1948a88350b9123ce948dbc4
auth: sha512 ce443fd244d4096c90ea2f5f87bbdefb0c96e30134a2214bc828526f8b9c604e8cdd504db833f051f3de2b4b87552a97acd892305a855ccdce1902899ab25a39
outbound
spi: e970a075
enc: aes-cb 6f534425badca8ec4f5a8db390f87ffd55e9a7fda3d11d6ae415a15f0d91b06b
auth: sha512 221db0397d159adda847605c2f0f1cdb75337ffa3d4289d6268b08953723300c334fef715b899f6e89881da710bf7c8dac65266fac21dc398a8400cca09bf474
NPU acceleration: none
fg #
|
Comments
Post a Comment